Schedules
Schedule Overview
There are a number of useful data screens available within the schedule itself that can be accessed via the tab controls:

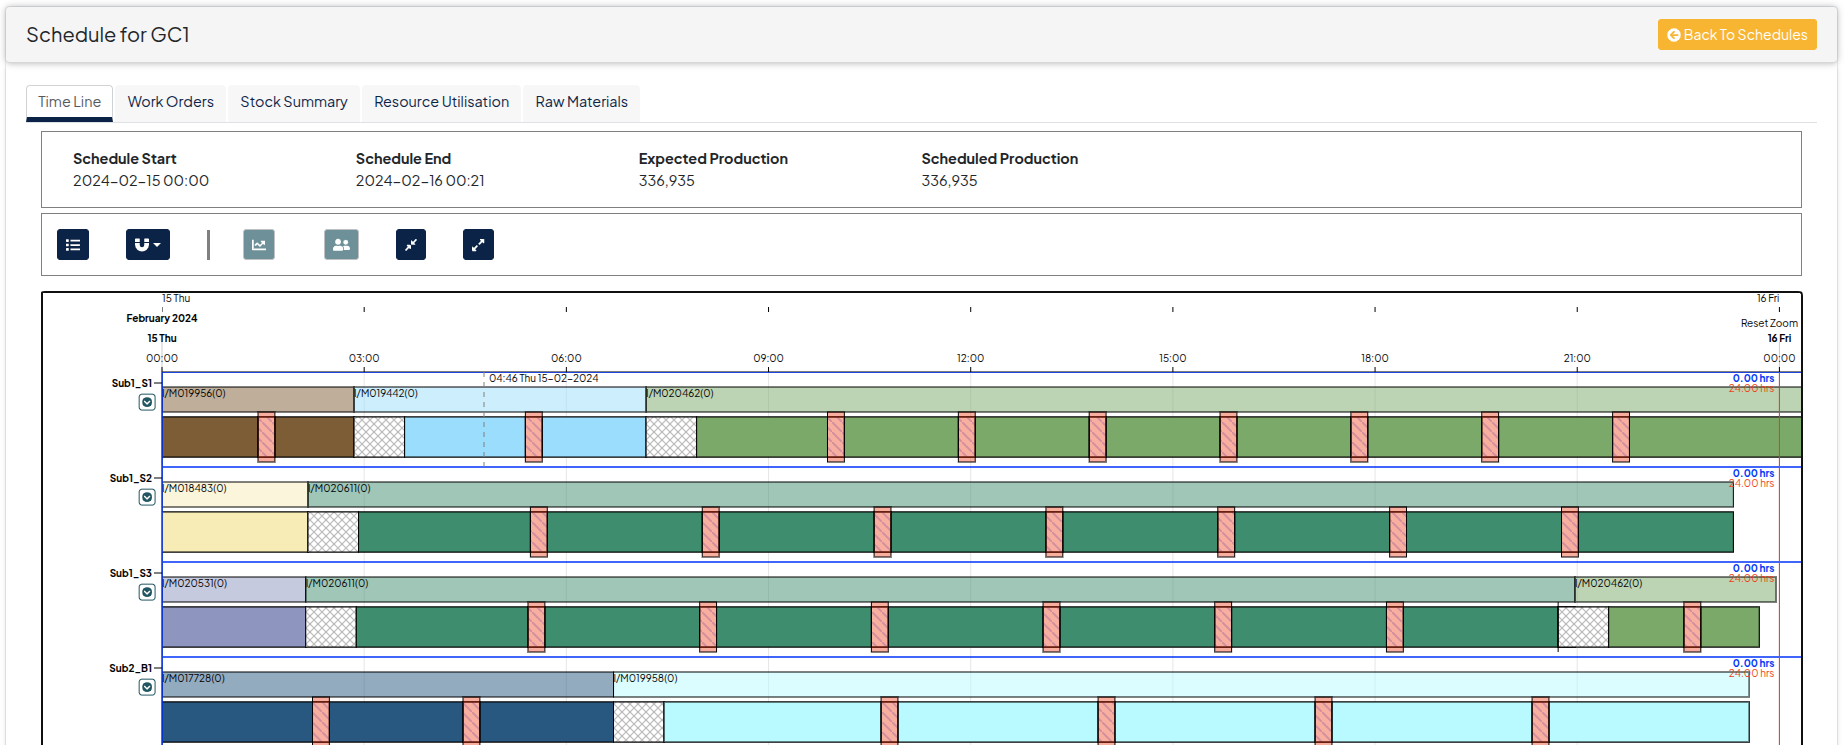
Time Line
The Time Line is the default view for the schedule, showing all of the Work Orders including their start time, end time, run rate, SKUs and expected quantities.
Also shown is the downtime and changeovers for the related Work Orders.
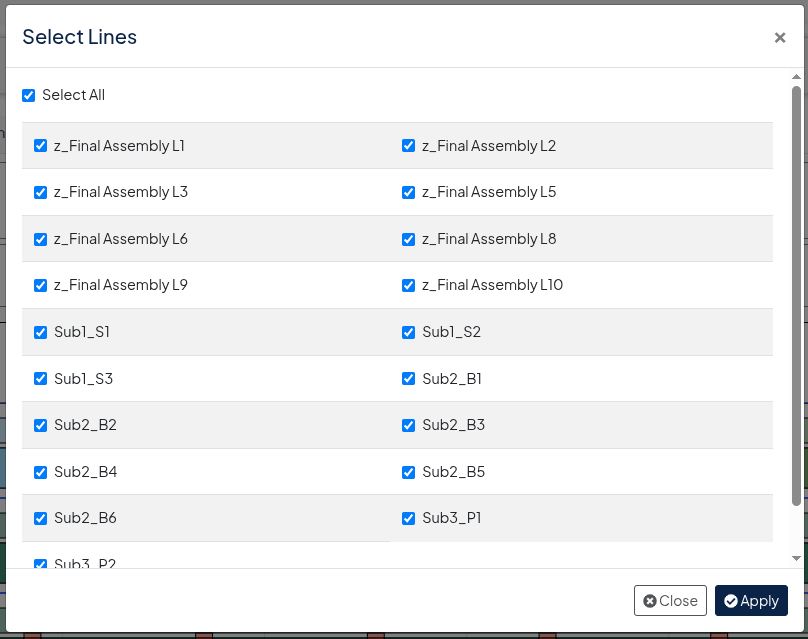
Other controls for this screen include the ability to select the lines you wish to view, setting the ‘snap’ interval for drag and drop, viewing labour as well as expanding and collapsing all of the lines for a more compact view:
Schedule Info Bar

Select Lines
Snap Interval
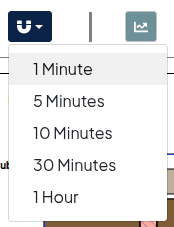
Adjusting the Snap Interval will affect the drag and drop functionality of the time line, allowing users to move events in specified increments.
Hover Tips
While navigating the time line, users have the ability to hover over any work order, changeover, downtime and production task to get a quick view of the details such as start and end times, run rate, skus and other related details:

Context Menus
To better manage each of the events in the time line, there are specific context menus for each, allowing you to perform a number of tasks seamlessly within the time line.
Managing Work Orders:
To manage Work Orders, simply right-click on the one you want to adjust. You will be presented with the following menu:
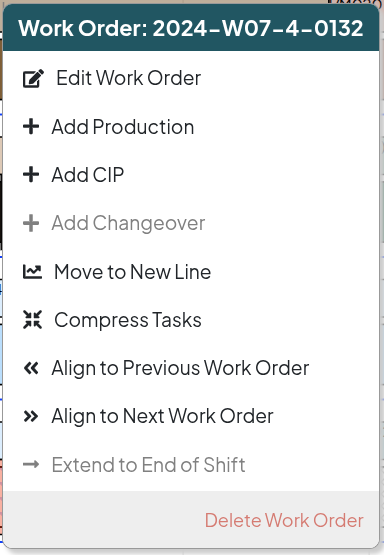
Users will be able to Edit the Work Order, Add Production to a Work Order, Add CIP, Add Changeovers, Compress related Tasks and Align the Work order to the closest Work Orders prior or after it as well as Delete the specified work order. Note that there is no undo feature so users should use certain features with caution.
Edit Work Order
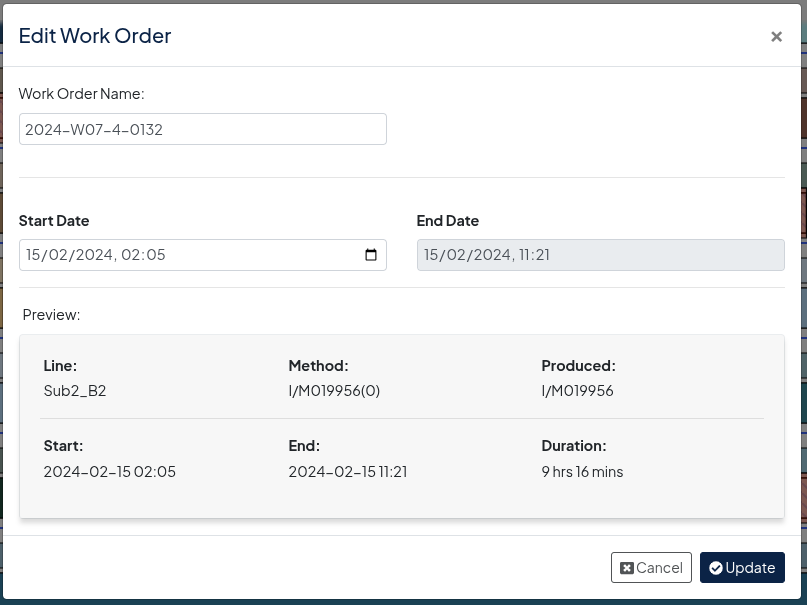
When editing a Work Order, users are able to change the Name and Start Date which will reflect on the Time Line in real-time after updating.
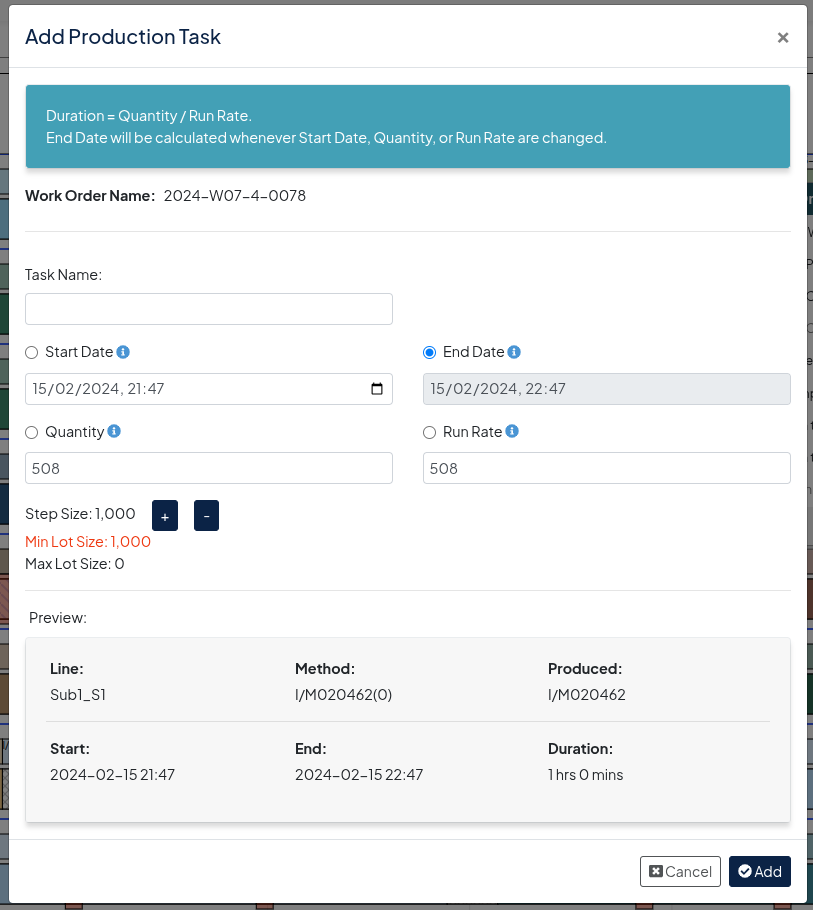
Add Production Task
Adding a production task to a work order allows users to add a new production task and adjust the following:
- Task Name
- Start Date
- End Date
- Quantity
- Run Rate
- Step Size
Please be aware that one of the variables will be fixed and automatically calculated based on the other variables. Users will need to decide which variables they want to adjust based on their requirements before entering any data.
In the example below, we know that we need to start production on 15/03/2025. We need to produce 5,000 units at a run rate of 500. The End Date will then be auto calculated based on the given data. Users are then able to tweak any of the variables to better suit their needs and the production will reflect in the time line in real-time after adding it.
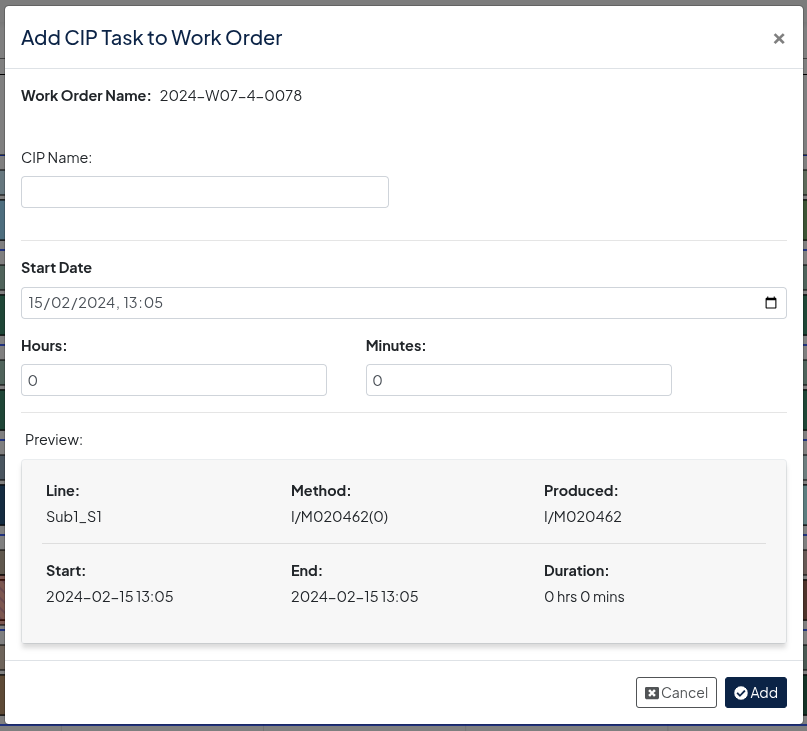
Adding CIP to Work Orders
Users can add in a CIP to any work order with the related details such as Name, Start Date and the CIP duration in hours / minutes. There will be a preview of the new CIP inside the dialogue allowing users to confirm that the new details are correct before saving.
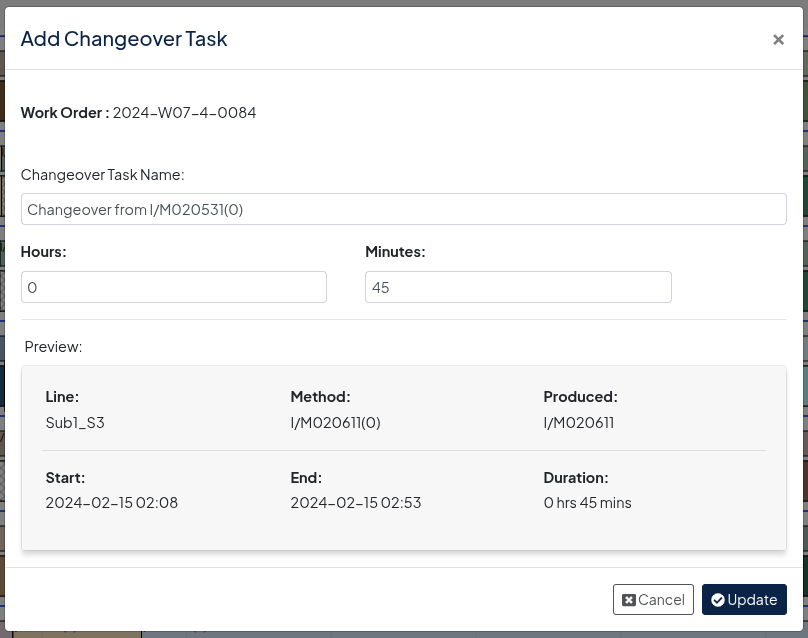
Add Changeover
Users can add a new changeover task to the work order via the context menu and will be able to give the event a name and specify duration in hours / minutes. The affect of the changeover will be presented in real-time once saved.
Note that editing a existing CIP will present the same dialogue, allowing users to adjust the duration via hours and minutes, as well as rename the event.
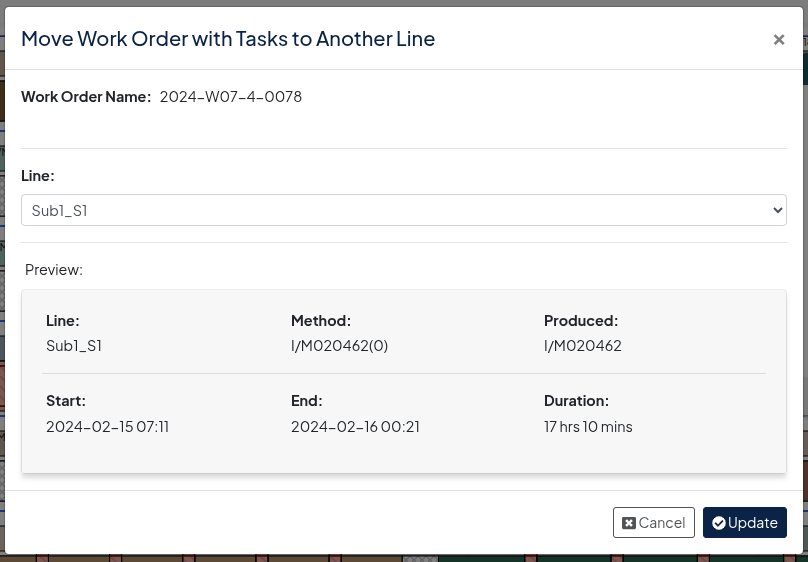
Move to New Line
Should the work order require changing to a new line for any reason, users can do this by selecting the desired new line from the dialogue and saving. This will be updated immediately to show the changes on the time line.
Compress Tasks
Should there be unused time available for work orders, users can compress all work orders on a given line with one click, which will ensure that all work orders follow one after the other without any gaps in time.
Production Tasks
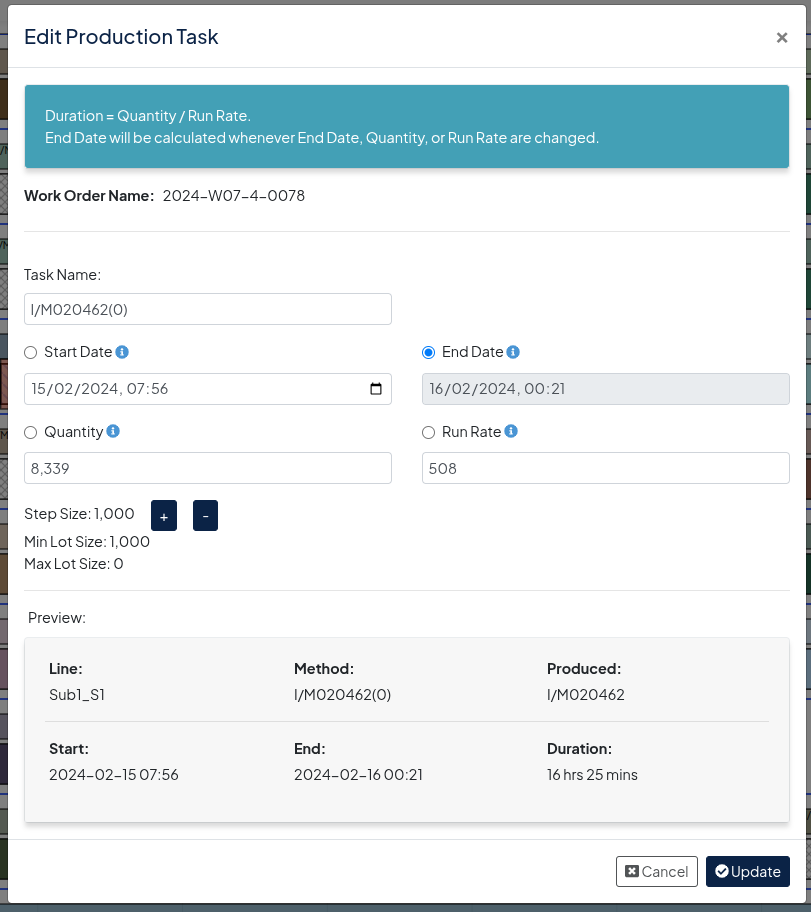
Edit Production Task
Editing a production task is similar to the Add production task dialogue, allowing users to edit the Name, Start Date, End Date, Run Rate and Step Size. The same functionality applies, whereby a user is required to have one of the values as fixed for automatic adjustment based on the other variables:
Split Production
This feature allows the user to split any given production task into multiple production tasks allowing more granular control over how the work order is produced. Note that clicking on Split Production will split the task at the cursor position, users can then further modify the details in the Edit Production dialog as previously detailed and create new Work Orders from the new production tasks.
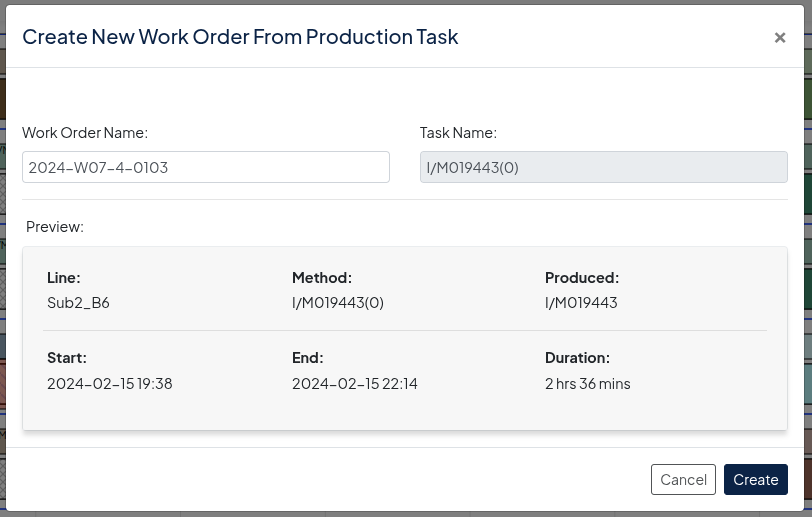
Create Work Order from Production Task
This allows users to quickly and easily create a work order for the production task that is added to the time line as well as the work order screens.
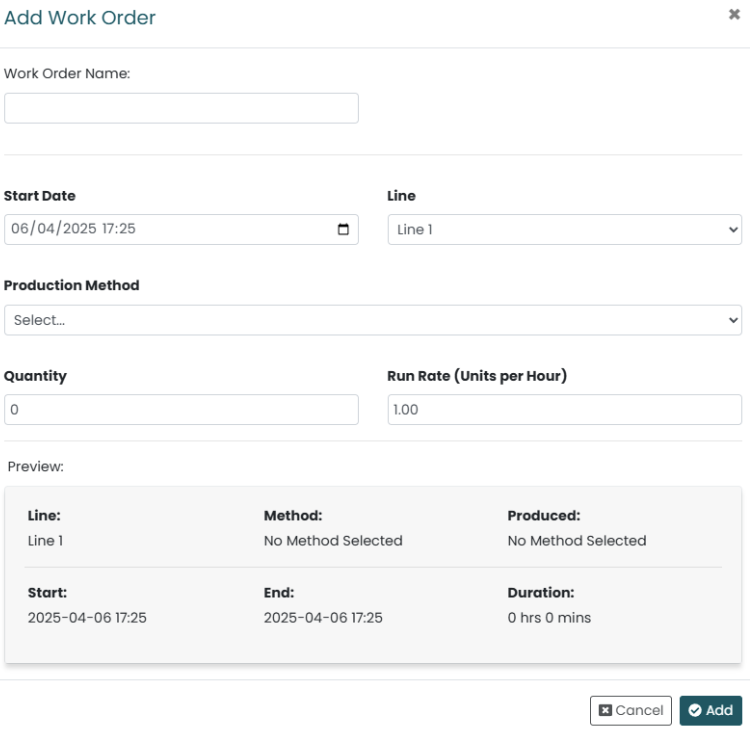
Add Work Order to Line
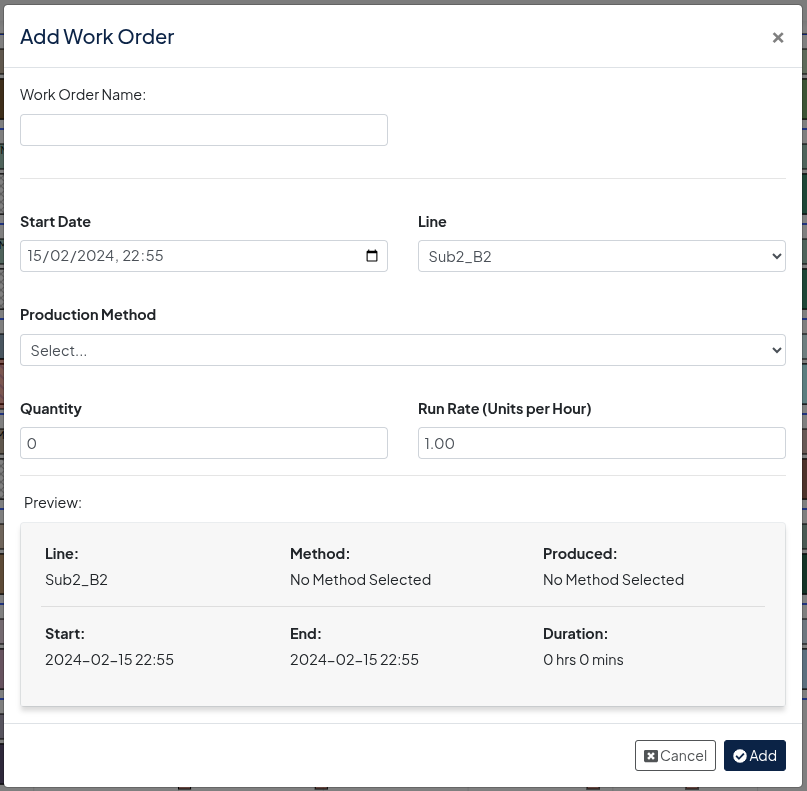
In order to create a new Work Order, users will be presented with a dialogue, allowing them to create a work order with the following details:
- Name
- Start Date
- Line
- Production Method
- Quantity
- Run Rate
There will be a preview of the Work Order below the details, allowing users to confirm the work order, and it will be entered into the time line once saved.
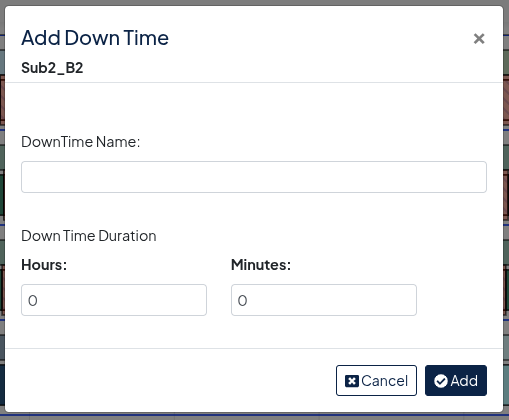
Adding / Editing Downtime
For any given line, users can add downtime to the time line which will block any production during that time period. Once added, downtime can be edited or deleted at any time.
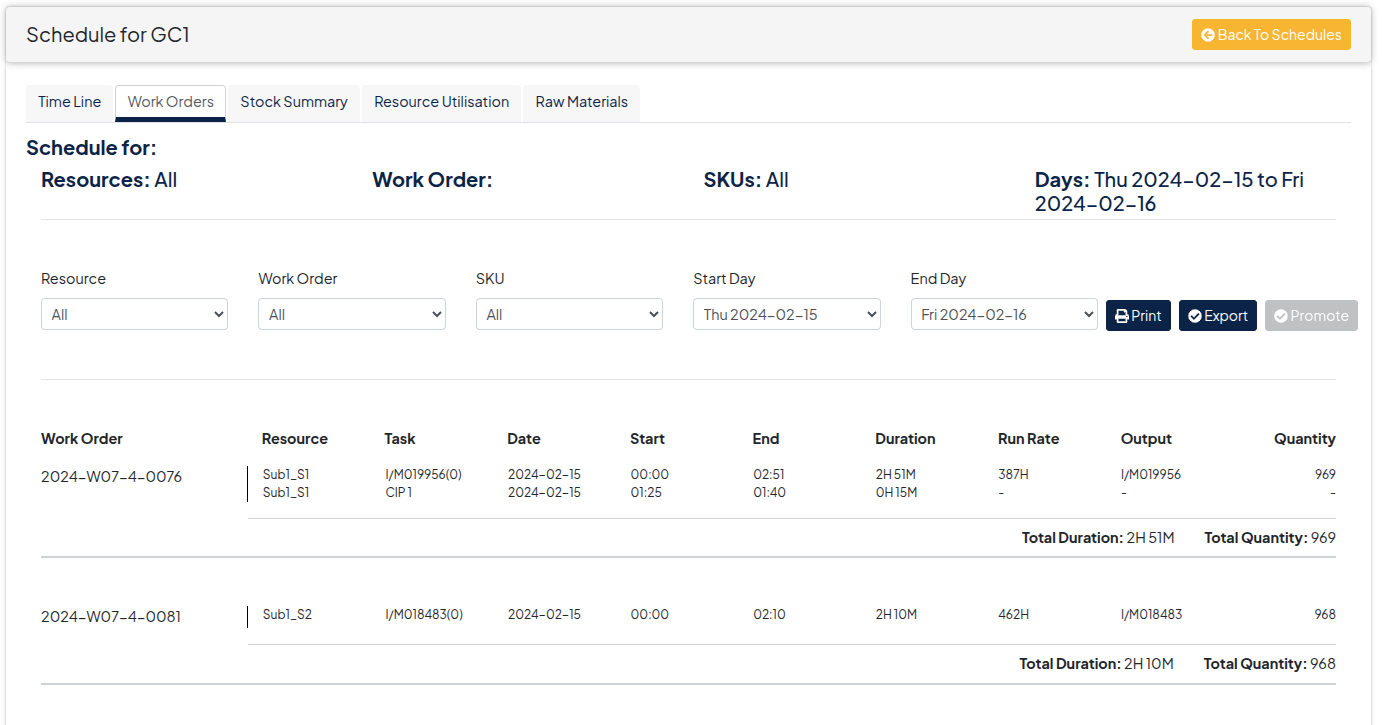
Work Orders Tab
The work orders tab gives users a clear and detailed view of all work orders for the given schedule.
Users are able to filter the work order further by means of the drop downs provided, allowing them to fine tune the output for each schedule. Options include Resource, Work Order, SKU, Start and End Days for each.
Once the desired output is ready, the work orders can then be downloaded or printed directly from the screen.
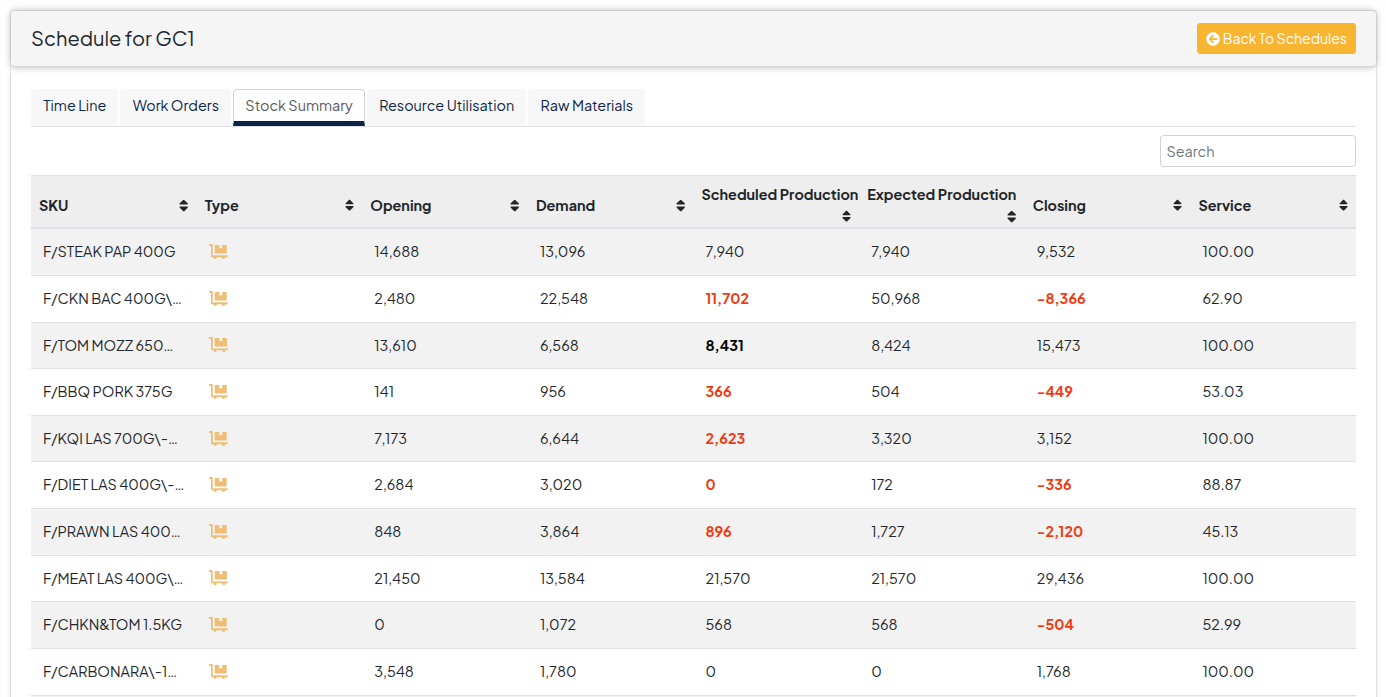
Stock Summary Tab
To better understand the schedule and to verify details, users can go to the Stock Summary tab and get a detailed view of each SKU being produced.
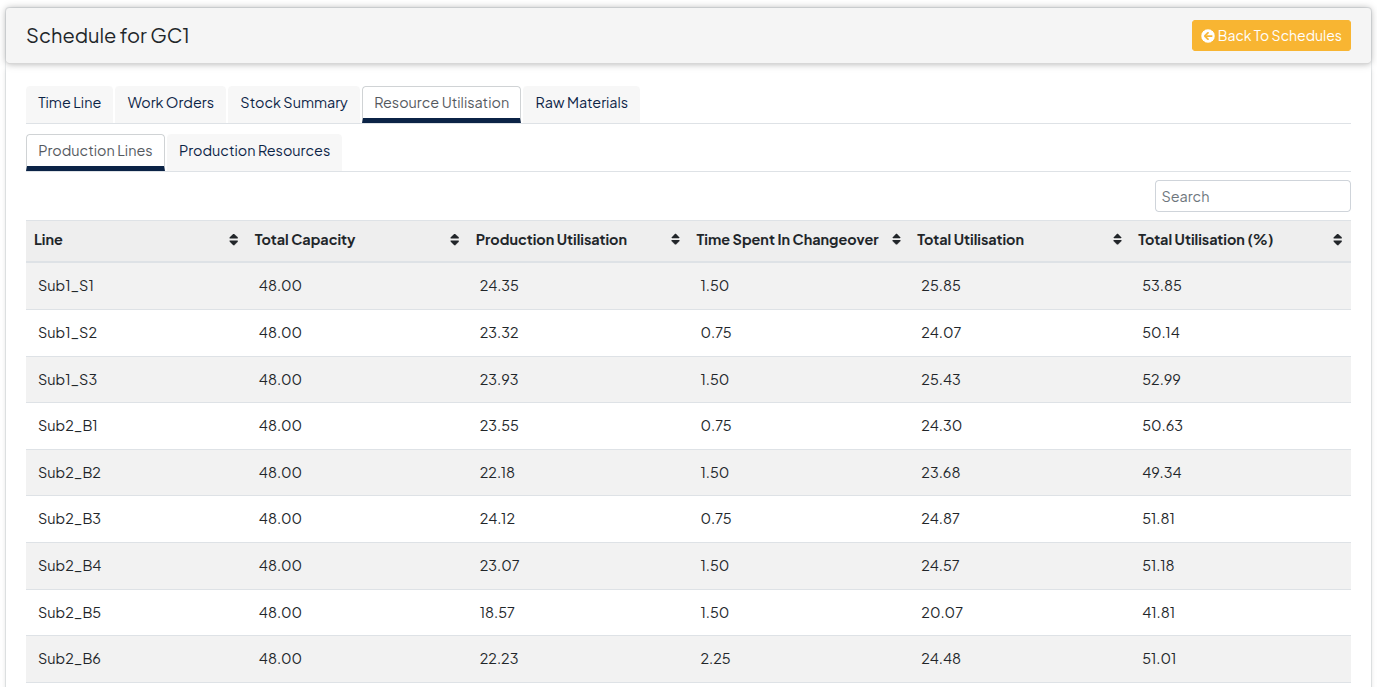
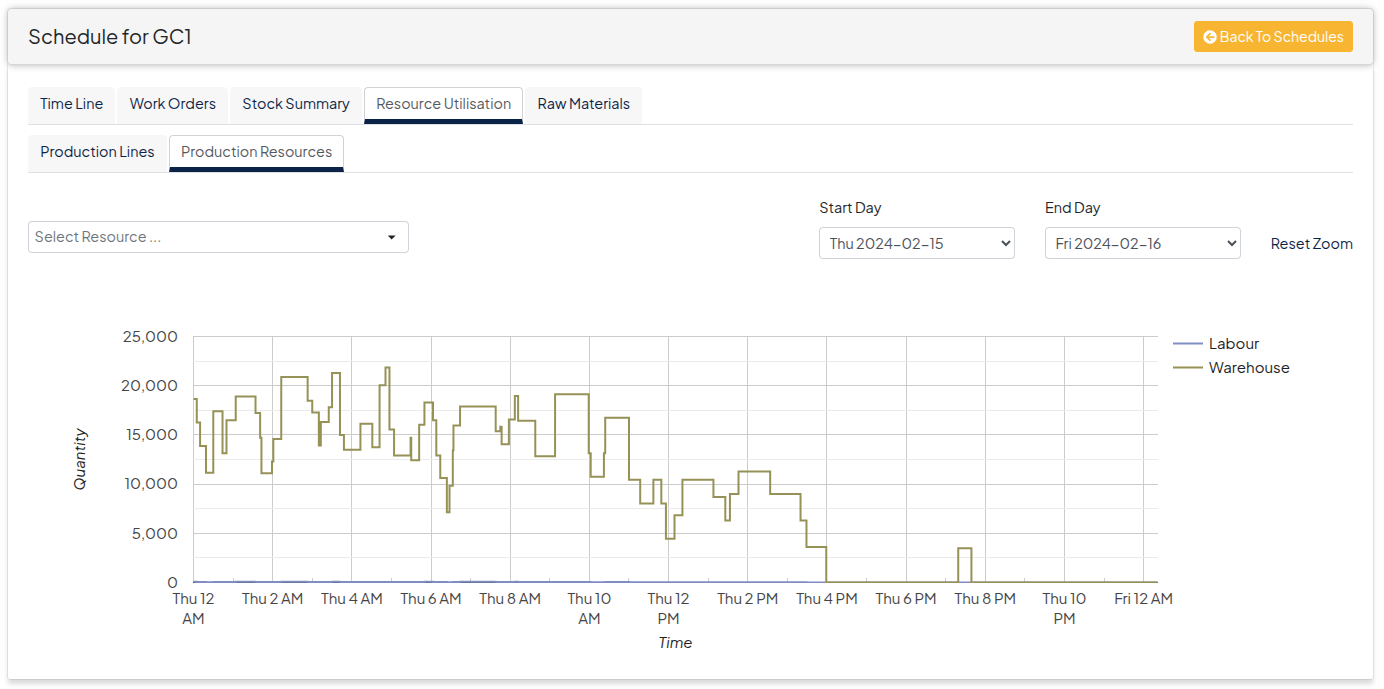
Resource Utilisation Tab
Production Lines
To get a more detailed view of how the resources are being allocated, the resource utilisation tab provides a full breakdown of each resource including Capacity, Production Utilisation, and Changeover Duration / Utilisation.
Production Resources
As well as the production lines, users are able to inspect the production resources graph to view detailed usage of each.
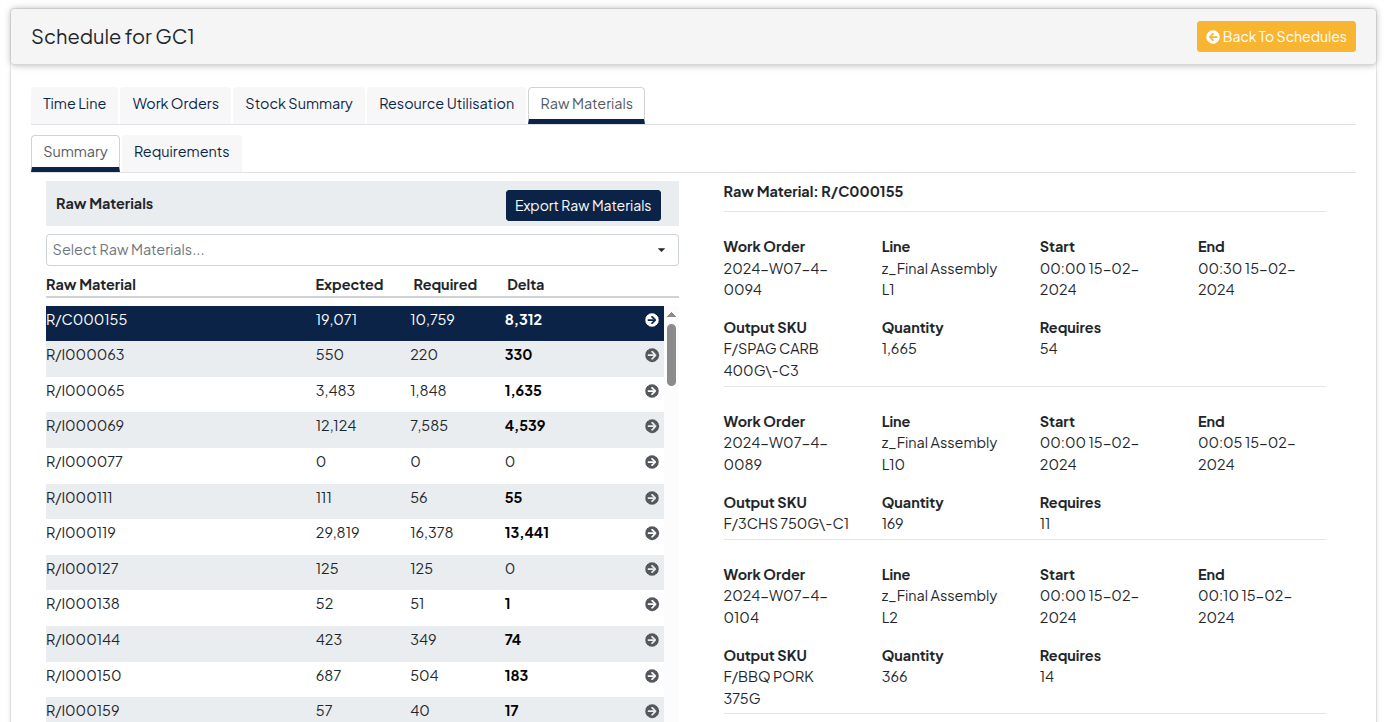
Raw Materials Tab:
Summary
Getting a detailed view of the Raw Materials requirements, the Raw Materials tab allows users to search for individual items and get a detailed view of exactly how and where it is being consumed including each Work Order, Start and End dates, Output SKU and quantities.
Requirements
For a more detailed visual inspection, the raw material requirements graphs are available, highlighting consumption in the timeline along with the usage details on each event.
